
Summary: What Rigid Resin for SLA Printing Means
Rigid resin for SLA printing is a high-stiffness photopolymer used in vat photopolymerization when low deflection matters more than bend-before-break behavior. Its main trade-off is that higher stiffness often comes with lower elongation, lower impact tolerance, and a greater risk of visible warp after curing if geometry and post-processing are not well controlled. [1] [6] [20]
In search language, “SLA” is often used loosely, but this article discusses vat photopolymerization broadly and separates laser SLA from projector- or mask-based systems only when that difference changes the result. ISO/ASTM 52900:2021 is the vocabulary anchor for that process family, and the current English listing is Edition 2, 28 pages, last reviewed and confirmed in 2025. [1] “Rigid” is a vendor label rather than a standardized modulus class, and no universal industry cutoff was found. Published examples show why: a laser SLA-family rigid resin can list a 10 GPa tensile modulus, while a projector-based rigid material can list 2400 MPa modulus and 30% elongation at break. [6] [12] The examples below are labeled by process class, and this is not a best-resin ranking, price guide, or universal tolerance guide. [1]
Scope and Key Definitions
Vat photopolymerization is the umbrella process family in ISO/ASTM terminology. Under that umbrella are laser-based SLA systems plus projector- and mask-based variants such as DLP, MSLA, and LCD-style resin printing, all of which solidify liquid photopolymer layer by layer with light. [1] Readers often search for “SLA resin” when they really mean the broader resin-printing category, so this article keeps that process boundary explicit and distinguishes platforms only when optics, conditioning, or post-cure workflow make the numbers non-comparable. Because tensile datasheet values are specimen results rather than automatic part guarantees, ASTM D638-22 is also relevant: it applies to plastics test specimens up to 14 mm, or 0.55 in., in thickness. [2]
Stiffness, strength, and hardness are related but not interchangeable. Stiffness is resistance to elastic deflection and is usually reported as modulus; strength is the stress a test specimen carries before yield or fracture; hardness is resistance to surface indentation. “Tough” does not mean “weak,” and “rigid” does not mean “strongest.” In practice, tough usually signals more energy absorption and deformation before failure, while rigid signals lower deflection under load. Because a TDS is built from coupons printed, conditioned, and cured in a defined way, the same resin can show materially different results if orientation, layer height, curing, or specimen preparation change. [1] [2]
Brief Background
Shrinkage-driven warpage in stereolithography has been studied for decades. A 2001 paper related warpage in layer-built plates to effective chemical shrinkage strain through lamination theory, and a 2003 study recorded out-of-plane warpage by shadow moiré and linked it to polymerization shrinkage strains in cured resin laminates. [19] [18] What has changed is the level of published material reporting: modern rigid and composite photopolymer datasheets often provide ASTM- and ISO-style mechanical data alongside thermal indicators such as HDT and, in some cases, Tg. A current projector-based filled rigid composite example reports 10,200 MPa tensile modulus and a Tg of 91 °C. [13]
Technical Principles: Why Rigid Resin Is Stiff (and Why That Can Backfire)
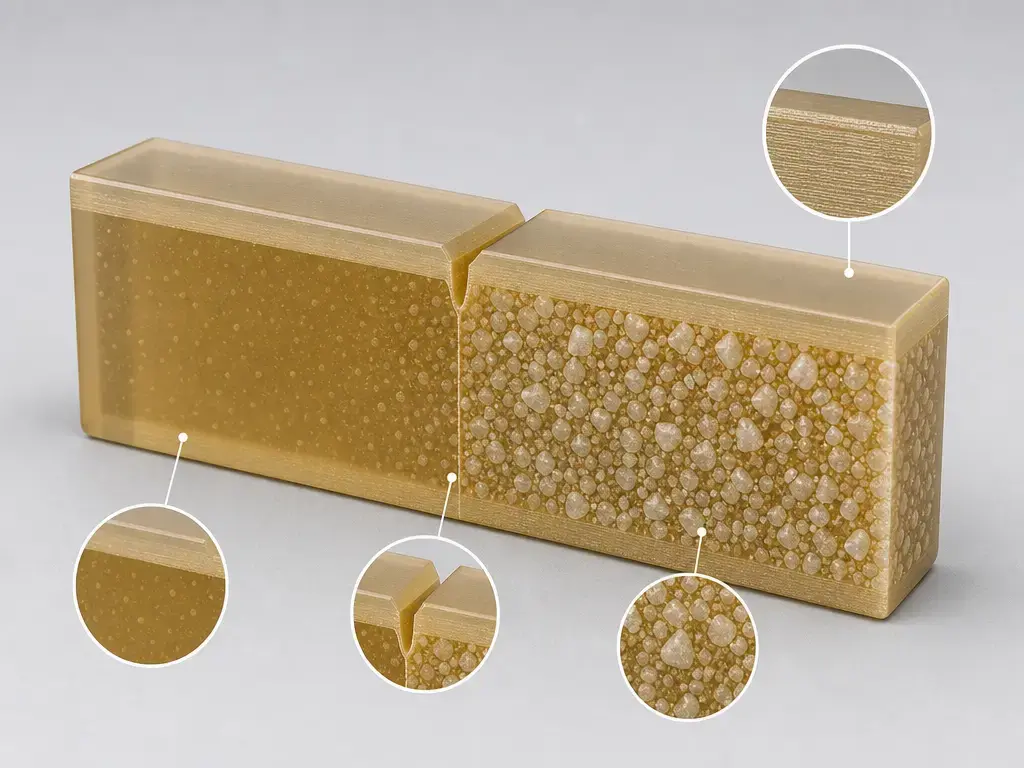
Rigid photopolymers are stiff because curing builds a densely crosslinked network with limited chain mobility. In practical use, that means the green part coming off the printer has reached its shape but not necessarily its final property state, so modulus, elongation, and thermal behavior can still shift during post-curing. A 2021 review of vat photopolymerization describes the cured network as irreversible: light-triggered polymerization forms chains or crosslinks, and the part cannot simply be returned to a liquid feedstock state. [23]
Fillers are the other main route to higher stiffness. Glass, mineral, or ceramic loading can raise modulus, hardness, and sometimes thermal performance, but it can also raise density, alter thermal expansion, and make fracture less forgiving. In a 2025 glass-powder reinforcement study, tensile strength rose from 24.03 MPa to 37.01 MPa and hardness from 73.7 HV to 84.5 HV as filler increased, while density rose from 1.201 to 1.338 g/cm³ and flexural stress fell from 32.13 MPa to 27.93 MPa. [21] UV post-curing adds another trade-off layer: a 2026 study reports relative stiffness gains of about 15% to 60% in rigid photopolymers after UV post-curing, but also more secondary shrinkage and dimensional deviation. Higher modulus does not imply better impact durability. [20]
In selection work, that means a resin can look better on a modulus chart while becoming less forgiving around corners, holes, thin ribs, support removal, or uneven curing histories. Rigid resin choice has to be tied to geometry and post-cure workflow rather than treated as a single-number purchase decision. [20] [21] [23]
Types and Taxonomy of Rigid Resins
A practical taxonomy starts with unfilled rigid engineering resins, then glass-filled or mineral-filled rigid resins, and then ceramic-filled rigid resins. In a laser SLA-family example, a rigid resin can reach 10 GPa tensile modulus with 1% elongation at break. [6] In the same laser SLA-family ecosystem, another rigid grade sits lower at 4.1 GPa modulus and 5.3% elongation, which already shows that “rigid” covers a wide span. [7] On projector-based platforms, filled rigid grades can push stiffness higher again: one composite example reports 10,200 MPa tensile modulus and 1.71 g/cm³ density. [13] Ceramic-filled rigid materials extend that pattern further; one manufacturer page describes a ceramic-filled grade as having stiffness around 10 GPa and HDT B above 280 °C because of high ceramic loading. [14]
The fourth category is high-temperature rigid resins, and the fifth is rigid-but-toughened formulations. High-temperature labels should be read through the test method, because HDT is still a deflection-under-load result rather than a blanket service-temperature promise. [5] Rigid-but-toughened materials trade away some stiffness to gain more elongation or impact tolerance. A useful reminder is the projector-based Figure 4 Rigid Gray example: despite the rigid label, it lists 2400 MPa tensile modulus and 30% elongation at break. [12] Across vendors, these five categories overlap, and the labels are vendor-facing rather than standardized industry classes. [6] [7] [12] [14]
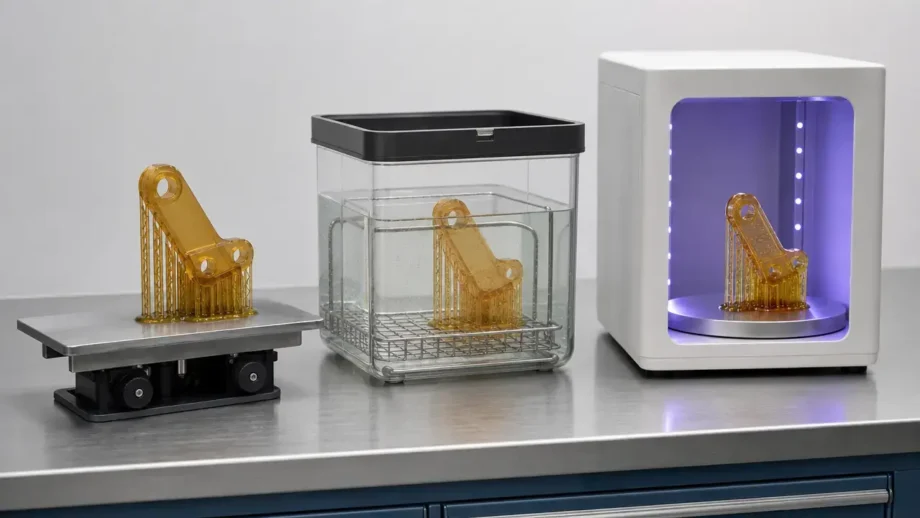
Workflow: Printing, Washing, Drying, and Post-Curing
A green part is the print before final curing; a post-cured part has received additional light and, in some workflows, heat so it can approach its intended mechanical and thermal state. Post-curing exists because printed photopolymers usually leave the machine short of full conversion, but that same post-cure can also change dimensions. [10] [20] [23]
- Mix filled resins thoroughly before printing, because particle settling changes local composition, cure behavior, and stiffness. One BASF Ultracur3D RG 3280 guide instructs roller-mixing the sealed bottle for two hours, then mixing the tray for one minute before each print. [15]
- Agitate open-material resin and then let it rest, because bubbles and inhomogeneity can interfere with consistent curing. One Strong-X guide recommends shaking for at least 2 minutes and resting for 10 minutes before use. [17]
- Choose orientation and supports to avoid long unsupported spans and severe constraint asymmetry, because build setup affects the stress history and later mechanical response of VPP parts. [24] [22]
- Wash parts thoroughly after printing, because residual uncured resin on the surface can continue reacting later and make post-cure results less uniform. [10]
- Dry parts fully before curing, because curing wet or solvent-contaminated surfaces can worsen surface quality and dimensional repeatability. [10] [17]
- Use the resin-specific cure recipe, because cure settings are not interchangeable across materials. Formlabs’ current chart lists Rigid 4000 at 15 min at 80 °C, Rigid 10K at 60 min at 70 °C, and a Rigid 10K thermal post-cure at 125 min at 90 °C. [8]
- Measure only after final cure and cooldown, because post-curing can keep changing both stiffness and dimensions while the part equalizes temperature and releases stress. [20]
The light source matters as well. Formlabs’ post-curing explainer describes Form Cure as using 405 nm light, notes that many curing systems use UV in the 10 nm to 400 nm range, and explains that post-curing forms additional crosslinks while causing minor shrinkage of the whole part. [10] Post-curing is therefore part of how a rigid resin 3D print reaches its published performance state. [10]
Safety should stay simple and strict: use gloves, eye protection, and suitable ventilation; handle wash solvents as controlled chemicals; and follow the resin SDS plus the printer, wash, and cure instructions for use. The Strong-X guide explicitly calls for protective measures, and the BASF guide points readers to the SDS before handling printing materials or wash media. [17] [15]

Performance Metrics for Stiff Resin Mechanical Properties
For stiff resin mechanical properties, the core group is tensile modulus, tensile strength, elongation at break, flexural modulus, flexural strength, and impact strength. Tensile modulus tells you how much a specimen resists elastic stretching; tensile strength tells you the peak tensile stress before failure or yield; elongation at break tells you how much strain the specimen tolerates before fracture. [2] Flexural modulus and flexural strength apply the same logic to bending, which often maps better to brackets, covers, and fixtures in use. ASTM D790 specifically warns that its beam equation is valid only up to a maximum fiber strain of 5% under the stated procedures, so flexural values are procedure-dependent comparison data rather than universal part truths. [3] Impact data, often reported as notched Izod, are especially useful for rigid materials because notches, sharp corners, and holes can dominate failure. ASTM D256-26 directs users to Test Method C for materials below 27 J/m, or 0.5 ft·lbf/in., reinforcing that brittle response is not a side detail for this class. [4] CTE helps estimate thermal expansion, while density and hardness are supporting indicators rather than first-choice selection metrics. [5] [13]
Density and hardness are easy to over-read. A denser rigid resin may simply be more heavily filled, and a harder surface can still fail abruptly under impact. The projector-based filled composite example in Source 13 illustrates the point: high density, high Shore D hardness, and very high modulus coexist with low elongation. [13] Read density as a clue about formulation and hardness as a clue about surface response, not as a shortcut for toughness or stiffness by themselves. [13] [21]
HDT vs Tg vs service temperature
Heat deflection temperature is a test result under load, not a universal operating temperature. ASTM D648-18 applies to rigid and semirigid plastics at 3 mm thickness or greater, warns that the result should not be used to predict elevated-temperature behavior except where time, temperature, loading method, and fiber stress are similar, and states that ASTM D648 results shall not be compared with ISO 75 results. [5] A datasheet that reports both HDT and Tg makes the distinction clearer: the projector-based Figure 4 Rigid Composite White sheet lists HDT at 0.455 MPa of 88 °C and Tg by DMA E” peak of 91 °C. [13]
How to compare datasheets fairly
Before comparing any two values, check the test method and revision, print system, layer height, build orientation, conditioning, post-cure state, specimen type, and whether the result is ASTM or ISO. [2] [5] For example, the current Formlabs Rigid 4000 page states that its cited properties came from Form 3 parts printed at 100 μm and post-cured for 15 minutes at 80 °C, while the Figure 4 Rigid Gray sheet states that parts were conditioned for a minimum of 40 hours at 23 °C and 50% RH. [7] [12] Coupon data are useful, but they are not the same as validated part data for your geometry. [2]
| Metric | What it tells you | Why it matters for rigid resin | Common mistake |
|---|---|---|---|
| Tensile modulus | Resistance to elastic stretching | Main low-deflection indicator | Treating it as a toughness score |
| Tensile strength | Peak tensile stress before failure or yield | Useful for load margin | Confusing strength with stiffness |
| Elongation at break | Ductility before fracture | Flags brittle versus forgiving behavior | Assuming low elongation means higher quality |
| Flexural modulus / strength | Bending response | Often closer to real fixture loading | Reading flexural values as universal service behavior |
| Notched Izod | Impact and notch sensitivity | Helps predict crack-prone failure | Ignoring the notch and test method |
| HDT | Deflection under load at temperature | Useful for heat-limited use cases | Treating it as continuous-use temperature |
| Density | Formulation clue | Helps interpret filled grades | Using density as a stiffness proxy |
| Hardness | Surface indentation resistance | Useful for wear and handling context | Assuming hard means impact-resistant |
The metric definitions and cautions above are grounded in ASTM D638, D790, D256, and D648. [2] [3] [4] [5]
Rigid Resin vs Tough Resin: Which to Choose?
Rigid resin is optimized for lower deflection, while tough resin is optimized for greater deformation and energy absorption before failure. Tough is not weak; it usually means lower modulus with much higher ductility or fracture tolerance. [6] [9]
The contrast is clear in published laser SLA-family examples from one ecosystem. A post-cured rigid resin can list 10 GPa modulus, 65 MPa ultimate tensile strength, and 1% elongation at break, while a post-cured tough resin in the same family can list 1800 MPa tensile modulus and 79% elongation at break. [6] [9] A middle case, Rigid 4000, sits between those extremes at 4.1 GPa modulus, 5.3% elongation, and about 22 to 23 J/m notched Izod, depending on which property block on the current page is read. [7] In practice, the choice is mostly about failure mode: do you need the part to stay straight, or do you need it to survive flex, snap, or impact? [6] [7] [9]
- Choose rigid when low deflection matters.
- Choose tough when snap-fits, impact, or repeated flexing matter.
- Choose high-temp when thermal load dominates, while still treating HDT as method-dependent.
- Choose standard for visual or fit prototypes where mechanical demand is modest.
| Resin class | Typical mechanical profile | Typical failure mode | Best-fit applications |
|---|---|---|---|
| Rigid | Higher modulus, lower elongation | Crack or snap after limited strain | Jigs, fixtures, stiff housings |
| Tough | Lower modulus, higher elongation | Yield and stretch before fracture | Snap-fits, functional prototypes |
| High-temp | Heat-oriented, method-sensitive stiffness | Thermal deflection or cracking under combined load and heat | Hot-zone fixtures, thermal tooling aids |
| Standard | General-purpose properties | Ordinary prototype breakage or wear | Visual models, fit checks |
Applications: What Rigid Resin Is Used For in SLA Printing
Rigid resin for SLA printing is commonly used for jigs and fixtures that must hold alignment, brackets and mounts that should not sag under modest load, thin-walled housings where shape retention matters, aerodynamic models and wind-tunnel parts, short-run molds or forms, and inspection or master models that benefit from dimensional hold and a more stable feel than general-purpose resin. [6] [7] The category is broader than the ultra-brittle end of the spectrum alone, because projector-based rigid materials can pair moderate stiffness with much higher elongation than 10 GPa-class filled grades. [12] Ceramic-filled rigid materials also support tooling and thermal-use discussions, but their HDT claims still have to be read through the exact test method and application geometry. [14] Do not substitute rigid resin parts into safety-critical structural roles without validation. [5]
Limitations and Failure Modes
The first limitation is brittleness. Many high-modulus rigid resins have low elongation and can be highly notch-sensitive, so the part may fail at a local stress raiser long before a simple tensile-strength number becomes relevant. [4] That is why impact data matter: ASTM D256-26 sends very brittle plastics into Test Method C below 27 J/m, which is a reminder that notched behavior can be central for this material class. [4] In design terms, sharp corners, small holes near edges, abrupt rib intersections, and drop-loaded features are often where rigid parts expose this downside first. [4] [21]
The second limitation is anisotropy, but it needs a balanced reading. A 2018 VPP study found that build orientation, layer thickness, and strain rate affect Young’s modulus, strength, and fracture strain, with anisotropy observed when specimens were fabricated in different planes. [24] A 2024 Additive Manufacturing Letters paper adds that the degree of mechanical anisotropy in laser VPP is resin-dependent rather than universal. [25] So “near-isotropic” should be treated as a possible outcome for some resin-platform combinations, not as a blanket rule for all rigid photopolymers. [24] [25]
The third limitation is environmental and process drift. Heat, additional UV exposure, moisture history, and post-cure timing can all shift the dimensional and mechanical balance, and NIST’s 2026 workshop report emphasizes that shrinkage and warpage depend on multiple variables including resin type, polymer type, time until post-curing, wavelength, and temperature. [22] Long-term or high-consequence uses therefore need application-specific validation rather than confidence based on one datasheet line. [22]
Why Rigid Resin Warps After Curing
Rigid resin warping after curing starts with polymerization shrinkage during printing. As the network forms, volume loss creates internal stress, and geometry plus build constraints determine whether that stress stays hidden or becomes bow, twist, or edge lift. The early stereolithography papers from 2001 and 2003 both support that link between chemical shrinkage strain and resulting warpage. [19] [18]
A second mechanism is secondary shrinkage during post-cure. The part may look acceptable when it comes off the printer, then move after additional light or heat because more conversion occurs while the geometry is no longer in the same stress state. A 2026 study reports that rigid photopolymers can gain roughly 15% to 60% in stiffness after UV post-curing while also showing greater dimensional deviation, and the same study ties that trade-off to constrained shrinkage and residual stress development. [20] When supports or handling constraints are removed, stored stress can relax into visible distortion, and nonuniform exposure makes the problem worse because one region densifies faster than another. NIST’s 2026 workshop report adds that resin type, polymer type, time until post-curing, wavelength, and temperature all affect shrinkage and warpage. [22] In short, why does rigid resin warp after curing? Because curing changes both the polymer network and the internal stress field at the same time. [18] [19] [20] [22]
How to Reduce Rigid Resin Warping After Curing
If you are troubleshooting rigid resin warping after curing, reduce asymmetry in shrinkage first. Large unsupported flat plates are high risk because small cure differences generate long bending arms, while ribs, gentle curvature, and more uniform wall sections spread strain more evenly and reduce bending moments. [11] Thin walls are especially sensitive, and an official Formlabs guide gives 0.2 mm as a starting point for both supported and unsupported SLA walls, 0.15 mm for engraved recessions, and 0.1 mm for embossed protrusions, while also warning that thin walls may warp or crack. [11] Post-curing can improve stiffness while hurting dimensional fidelity, so aggressive curing is not automatically the right answer for dimension-critical rigid parts. [20]
The practical answer is usually a combination of geometry, support timing, drying, and cure symmetry. Follow the resin-specific cure recipe rather than a generic “more UV is better” rule, because official settings already differ across rigid materials and cure units. [8] Orient the part so long broad faces are not carrying avoidable stress concentration, keep broad spans supported until cure and cooldown are complete, and do final inspection only after the part is dry, fully cured, and thermally settled. [8] [20] [22]
- Avoid large unsupported flat plates, or break them up with ribs or curvature, because wide flat areas amplify differential shrinkage into visible bowing. [11] [20]
- Use fillets and more uniform wall sections, because smoother geometry reduces abrupt stress concentration and uneven shrink accumulation. [11] [22]
- Orient parts to reduce long stressed spans and abrupt constraint changes, because build setup influences how residual stress is created and later released. [24] [22]
- Keep supports or temporary stiffening features on broad spans until after cure and cooldown, because early release lets stored stress relax asymmetrically. [20] [22]
- Dry parts fully before curing, cure them symmetrically with the manufacturer’s settings, and cool them before measuring, because solvent residue, uneven exposure, and hot-state measurement all make distortion look worse or more variable. [8] [17] [20]
Research and Standardization Context
The measurement gap is practical, not academic. NIST’s 2026 workshop report says a tolerance of 5% in light intensity was discussed as a desirable goal and also highlights the need for standardized test geometries for shrinkage and warpage. [22] That matters because rigid-resin outcomes depend not only on chemistry, but also on whether the light engine is uniform, stable, and reported in a way users can compare. [22]
For readers, the takeaway is disciplined interpretation. Do not over-read one modulus number, one HDT line, or one rigid label as if it predicts full part behavior. ASTM D648 itself says HDT data are not intended for design or for predicting elevated-temperature endurance except under similar factors, and it states that ASTM D648 and ISO 75 results shall not be compared. [5] The safer habit is to validate geometry, platform, orientation, conditioning, and post-cure workflow as a set rather than assuming any single coupon value transfers unchanged into your part. [2] [5] [22]
Choosing Rigid Resin for SLA Printing: Key Takeaways
For rigid resin for SLA printing, the selection stack is modulus first for low deflection, then elongation, then impact behavior, then HDT with its exact method and load, then the post-cure workflow, and finally geometry sensitivity. [5] [6] Treat tensile and flexural values as coupon data from defined test conditions rather than universal guarantees, and remember that even one resin can publish different outcomes depending on whether it was tested green, UV post-cured, or UV plus thermal post-cured. [2] [6]
FAQ
1. What is rigid resin used for in SLA printing?
It is used for parts that need to stay straight and resist elastic deflection under modest load, such as jigs, fixtures, mounts, housings, and master models. The reason to choose it is dimensional hold and stiffness, not high impact tolerance. [6] [7] [12]
2. Rigid resin vs tough resin: which should I choose?
Choose rigid when the part must hold shape under load, and choose tough when repeated flexing, snap-fits, or impacts matter more. A post-cured laser SLA-family rigid example at 10 GPa modulus and 1% elongation behaves very differently from a post-cured tough example at 1800 MPa modulus and 79% elongation. [6] [9]
3. Why does rigid resin warp after curing?
Because polymerization shrinkage during printing and secondary shrinkage during post-cure both build internal stress, and that stress turns into distortion when geometry or support conditions are uneven. Nonuniform exposure, residual stress release, and cure timing can all make the same part move after it looked acceptable off the printer. [18] [19] [20] [22]
4. How can I reduce warping when printing with rigid resin?
Make the part shrink more symmetrically: avoid large unsupported flats, use ribs or smoother wall transitions, dry fully before cure, and keep support strategy aligned with the post-cure plan. Then use the resin-specific cure settings and measure only after cooldown, because post-cure can change both dimensions and stiffness. [8] [11] [20]
5. What are the mechanical properties of stiff resin, and which ones matter most?
The main properties are tensile modulus, tensile strength, elongation at break, flexural modulus, flexural strength, impact strength, CTE, density, and hardness. For most rigid-resin decisions, modulus, elongation, and impact strength tell the fastest story about whether the part will stay straight, crack early, or survive handling. [2] [3] [4]
6. Expert: How do I compare HDT values across datasheets?
First match the method, load, specimen context, and cure state before you compare anything. ASTM D648 is not directly comparable with ISO 75, and HDT is a deflection-under-load measurement rather than a blanket service-temperature rating. [5] [13]
7. Expert: Are vat-photopolymer parts really isotropic, and when does orientation still matter?
Not as a universal rule. A 2018 study found that orientation and layer thickness affect mechanical response in VPP specimens, and a 2024 paper reports that mechanical anisotropy in laser VPP is resin-dependent. [24] [25] Treat isotropy as something to verify for your resin-platform-workflow combination, not something to assume from the process name alone. [24] [25]
All rigid-resin numbers are safest when read as material plus printer plus cure state plus geometry, not material alone. [2] [8] [20]
Sources
-
ISO/ASTM 52900:2021 Additive manufacturing — General principles — Fundamentals and vocabulary. ISO. Edition 2, published 2021-11, last reviewed and confirmed in 2025. https://www.iso.org/standard/74514.html
-
ASTM D638-22 Standard Test Method for Tensile Properties of Plastics. ASTM International. Active standard, last updated 2022-07-21. https://store.astm.org/standards/d638
-
ASTM D790-25 Standard Test Methods for Flexural Properties of Unreinforced and Reinforced Plastics and Electrical Insulating Materials. ASTM International. Active standard, last updated 2026-02-26. https://store.astm.org/standards/d790
-
ASTM D256-26 Standard Test Methods for Determining the Izod Pendulum Impact Resistance of Plastics. ASTM International. Active standard, last updated 2026-04-29. https://store.astm.org/d0256-26.html
-
ASTM D648-18 Standard Test Method for Deflection Temperature of Plastics Under Flexural Load in the Edgewise Position. ASTM International. Active standard, last updated 2018-04-23. https://store.astm.org/standards/d648
-
Formlabs Rigid 10K Resin Technical Data Sheet. Rev. 04, prepared 2020-07-10, revised 2022-12-12. https://formlabs-media.formlabs.com/datasheets/2001479-TDS-ENUS-0.pdf
-
Formlabs Rigid 4000 Resin product page. Accessed 2026-06-27. https://formlabs.com/global/products/rigid-4000-resin/
-
Formlabs Form Cure V1 time and temperature settings. Last updated 2026-06-09. https://s3.amazonaws.com/servicecloudassets.formlabs.com/media/Finishing/Post-Curing/115001414464-Form%20Cure%20Time%20and%20Temperature%20Settings/FormCurePost-CureSettings.pdf
-
Formlabs Tough 2000 Resin V2 Technical Data Sheet. Rev. 01, 2025-10-06. https://formlabs-media.formlabs.com/datasheets/251013-MS-TDS-Tough_2000_V2.pdf
-
Formlabs, “An Introduction to Post-Curing SLA 3D Prints.” Accessed 2026-06-27. https://formlabs.com/uk/blog/introduction-post-curing-sla-3d-prints/
-
Formlabs, “Minimum Wall Thickness for 3D Printing.” 2023. https://formlabs.com/blog/minimum-wall-thickness-3d-printing/
-
3D Systems Figure 4 Rigid Gray datasheet. 2025-04-04. https://www.3dsystems.com/sites/default/files/2025-04/3d-systems-figure-4-rigid-gray-datasheet-usa4-2025-04-04-web.pdf
-
3D Systems Figure 4 Rigid Composite White datasheet. 2025-04-04. https://www.3dsystems.com/sites/default/files/2025-04/3d-systems-figure-4-rigid-composite-white-datasheet-a4-2025-04-04-web.pdf
-
Forward AM Ultracur3D RG 3280 product page. Accessed 2026-06-27. https://forward-am.com/material-portfolio/ultracur3d-photopolymers/rigid-line/ultracur3d-rg-3280/
-
BASF Ultracur3D RG 3280 Material Best Practice Guide. Rev. R03, 2024. https://knowledge.etec.desktopmetal.com/Materials/Material-Best-Practice/BASF-Ultracur3D-RG3280-Material-Best-Practice-Guide/81-00269_R03_EN%20BASF%20Ultracur3D%20RG%203280%20Material%20Best%20Practice%20Guide.pdf
-
Liqcreate Strong-X product page. Accessed 2026-06-27. https://www.liqcreate.com/product/strong-x/
-
Liqcreate Strong-X User’s Guide. December 2017. https://www.liqcreate.com/downloads/userguide/User%27s%20Guide%20Strong-X.pdf
-
Karalekas, D., and Aggelopoulos, A. K. “Study of shrinkage strains in a stereolithography cured acrylic photopolymer resin.” 2003. Metadata entry with DOI 10.1016/S0924-0136(03)00028-1. https://oamonitor.ireland.openaire.eu/national/search/publication?pid=10.1016%2Fs0924-0136%2803%2900028-1
-
Aggelopoulos, A. K., and Karalekas, D. “Determination of Cure Shrinkage in SL Layer Built Plates using Lamination Theory.” 2001. DOI 10.1177/096369350101000101. https://journals.sagepub.com/doi/10.1177/096369350101000101
-
Menargues et al. “Process–property Trade-offs Induced by UV Post-curing in Stereolithography Building: A Resin-dependent Analysis.” The International Journal of Advanced Manufacturing Technology. Published 2026-06-06. https://link.springer.com/article/10.1007/s00170-026-18359-0
-
“Enhanced Mechanical Properties of the Additively Manufactured Modified Hybrid Stereolithography (SLA)–Glass Powder.” Journal of Composites Science, 2025. https://www.mdpi.com/2504-477X/9/5/205
-
Higgins, C., and Killgore, J. Photopolymer Additive Manufacturing 2023 Workshop Report: Charting the Future of Photopolymer Additive Manufacturing. NIST AMS 100-74, January 2026. https://tsapps.nist.gov/publication/get_pdf.cfm?pub_id=961022
-
Pagac, M. et al. “A Review of Vat Photopolymerization Technology: Materials, Applications, Challenges, and Future Trends of 3D Printing.” Polymers, 2021, 13, 598. https://mdpi-res.com/polymers/polymers-13-00598/article_deploy/polymers-13-00598.pdf?version=1613551132
-
Naik, N., and Kiran, R. “On anisotropy, strain rate and size effects in vat photopolymerization based specimens.” Additive Manufacturing, 2018. https://www.sciencedirect.com/science/article/pii/S221486041730235X
-
“Resin-dependent mechanical anisotropy in laser vat photopolymerization correlates to the initial rate of polymerization and critical energy.” Additive Manufacturing Letters, 2024. DOI 10.1016/j.addlet.2024.100264. https://www.sciencedirect.com/science/article/pii/S2772369024000720