Summary
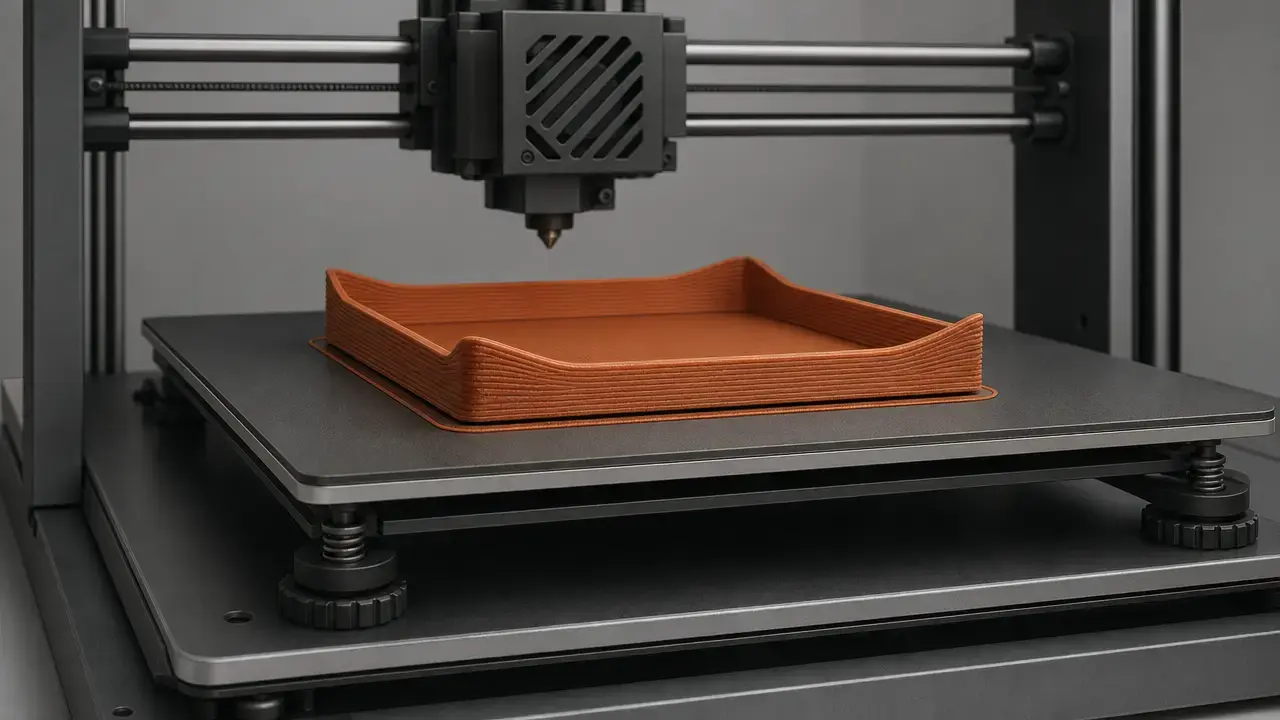
Ironing 3d printing is a slicer-generated finishing pass for material-extrusion prints. It sends the hot nozzle back over a printed top surface with very low extra flow to smooth the finish and fill tiny gaps. [6] [7]
Used well, it can make flat top faces look cleaner and more uniform, especially on parts such as lids, plates, labels, and nameplates. [6] Cura describes it as an extra trip over the top surface with very little material, while Prusa describes it as a special second infill phase on the same layer. [6] [7] The trade-off is time, extra heat exposure, and a higher chance of side effects such as edge fuzz, jagged perimeters, or printer-dependent heat-creep and clogging on long, slow ironing moves. [6] [7] That is why ironing is usually a finishing tool for already-good top surfaces, not a fix for a weak print setup. [6] [10]
What Is Ironing in 3D Printing?
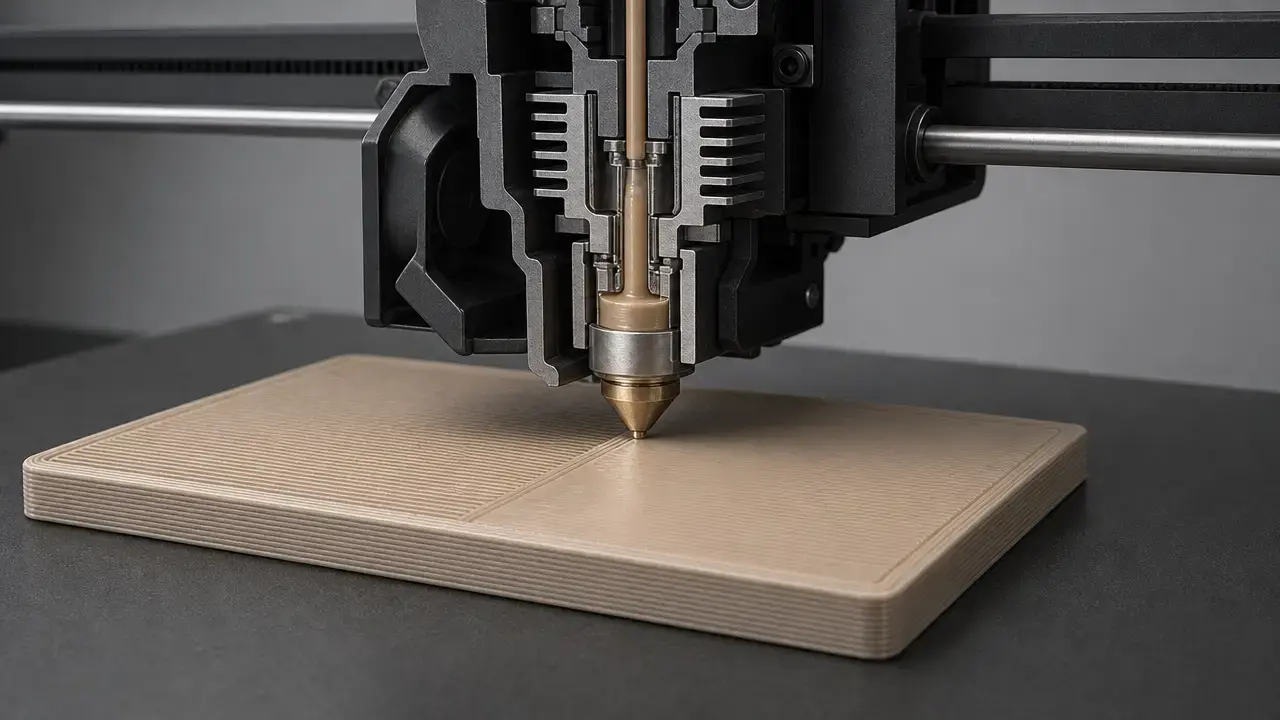
Ironing is an in-process slicer finishing pass for material extrusion, including consumer FDM and FFF workflows, in which the nozzle revisits an already printed top surface at the same height with very low added flow. [5] [6] Prusa describes it as a special second infill phase on the same layer, Cura describes it as going over the top surface one additional time while extruding very little material, and OrcaSlicer describes it as printing a second time at the same height with a very low flow rate and a defined pattern. [6] [7] [10] In plain language, top surface ironing is a controlled smoothing pass meant to improve a smooth top layer on flat, upward-facing faces. [6] [7]
It is not sanding, vapor smoothing, heat-gun smoothing, burnishing, or simply printing the last layer slower. [6] [7] It is also not the same as changing the normal top-skin pattern, because the normal top surface has already been deposited before ironing starts. [6] [7]
Historical Background
Prusa’s documented account gives the clearest short history. [6] In that account, Prusa credits user Neotko and the label “Neosanding,” says the idea later appeared in Cura, and notes that Kisslicer used a 45° approach that Prusa also adopted. [6] The same Prusa article says ironing became available in PrusaSlicer starting with version 2.3.0. [6]
How Top-Surface Ironing Works
Mechanically, ironing is a second nozzle pass at the same Z height with very low flow, so the hot nozzle acts partly like a heated smoothing tool and partly like a micro-gap filler. [6] [7] Prusa says the nozzle travels over the just-printed top layer, flattens curled plastic, and extrudes a small amount of filament to fill holes, while Cura says the extra pass melts the plastic on top further so creases can be filled. [6] [7]

It works best on flat, bed-parallel, upward-facing top surfaces because the nozzle can stay in consistent contact with one plane. [6] That also means it cannot rescue pillowing, poor support under the top skin, or a top surface that was badly printed in the first place. [6] If the baseline top surface is already uneven, ironing usually makes those defects more obvious rather than hiding them. [6] [10]
The main settings interact closely. [6] [7] Line spacing changes how much of the surface gets revisited, flow changes how much material is available to fill shallow grooves, speed changes heat exposure and dwell time, and inset changes how close the pass runs to the perimeter. [7] Cura warns that ironing all the way to the edge can create a jagged edge, and Prusa warns that edges can become a tiny bit fuzzy or less sharp because the physical nozzle is still full size even when extrusion is very small. [6] [7]
- Low flow fills small gaps and creases. [6] [7] [10]
- The hot nozzle softens raised ridges. [6] [7]
- Close line spacing increases overlap and coverage. [6] [7]
- Slow speed increases heat exposure and dwell time. [6] [7]
- Excess flow or too much dwell time can create blobs, ridges, or edge fuzz. [6] [7] [10]
Consumer Slicer Ironing vs Research Per-Layer Ironing
Most users mean top-surface ironing when they talk about ironing, because consumer slicers typically expose options such as top surfaces, topmost surface only, or all solid surfaces and layers. [6] [10] Some research papers study a different protocol in which ironing is applied after every printed layer, which changes thermal history and can affect both roughness and mechanical outcomes. [12]
Don’t generalize per-layer study results to top-surface ironing.
Most consumer slicers iron final top surfaces, the topmost surface, or all solid surfaces and layers, not every printed layer. [6] [10]
The 2024 Scientific Reports study applied ironing after every printed layer on PLA MEX parts, so its results are not a direct prediction of what a home printer will do with top-surface-only ironing. [12]
Terminology and Measurement Boundaries
When the discussion shifts from slicer practice to standards or papers, material extrusion is the cleaner umbrella term. [1] [5] ISO/ASTM 52900:2021 is the core additive-manufacturing vocabulary anchor, but it does not establish a separate standardized term for ironing itself. [1] NIST describes material extrusion as a layer-by-layer process used by both personal and commercial 3D printers, which is why the same family of parts is often discussed as FDM or FFF in hobby use and as material extrusion in research use. [5]
Do not mix the measurement categories. [2] [3] [4] Ra and Rz are profile surface-texture parameters within ISO 21920-2, and the ISO 21920-2 page also lists ISO 4287:1997 as withdrawn, which matters because older roughness references may still cite it. [2] Flatness belongs to a different geometrical-tolerancing family under ISO 1101. [3] Gloss is measured differently again, with ISO 2813 specifying 20°, 60°, and 85° geometries. [4] Edge sharpness is another outcome driven by geometry and toolpath behavior, and Prusa explicitly warns that ironing can make edges slightly fuzzier or less sharp. [6] Roughness, flatness, gloss, and edge sharpness are related, but they are not interchangeable. [2] [3] [4] [6]
Preconditions for Successful Ironing
If the top finish looks bad before ironing, the main problem is often upstream: unstable extrusion, too little solid top material, weak support under the top surface, or heat control that is already marginal. [6] [10] Prusa’s calibration note is blunt that ironing is very sensitive to accurate extruder calibration, and both Prusa and OrcaSlicer warn that slow, small extrusion during ironing can raise heat-creep and clogging risk on some machines. [6] [10] Large flat areas deserve extra caution because they combine long dwell time with slow filament movement. [6] [10]
- Calibrate normal extrusion first. [6]
- Make sure the top surface is already good enough before ironing. [6] [10]
- Use enough top layers or top thickness before expecting ironing to help. [6]
- Watch heat management on large flat areas. [6] [10]
- Monitor hotend cooling if your printer is sensitive to slow filament movement. [6] [10]
Cura Ironing Top Layer: Where to Find It and What Each Setting Does
If you are searching for cura ironing top layer controls, the practical path is to switch to custom settings if needed, enable ironing, choose whether you want only the highest layer or a broader top-surface treatment, and then preview the toolpath before printing. [7] Cura’s code-level setting names are clear enough to explain the feature even if the exact UI layout changes by version. [7]
Enabling ironing
Cura’s base definition includes both Enable Ironing and Iron Only Highest Layer, and both default to false. [7] In plain language, the first turns the feature on, and the second limits it to the final layer of the mesh instead of ironing lower top surfaces as well. [7]
Cura setting meanings and base-definition defaults
Cura defines Enable Ironing as an extra pass over the top surface with very little material, Iron Only Highest Layer as a time-saving restriction to the very last layer, Ironing Pattern as either Concentric or Zig Zag, and Monotonic Ironing Order as an ordering option that can make flat surfaces look more consistent. [7] Cura’s base-definition defaults are 0.1 mm for line spacing, 10% for ironing flow, 0.35 mm for ironing inset, and 20 mm/s for ironing speed, with Zig Zag as the default pattern and Monotonic Ironing Order set to false. [7] In practical terms, spacing controls coverage, flow controls how much plastic is available to fill creases, inset keeps the pass away from the perimeter, and speed controls dwell time over the surface. [7]
These are base-definition defaults, not guaranteed active print settings. [7] Cura uses a settings stack, and Uranium’s ContainerStack.getProperty states that value lookup starts at the top of the stack and falls through containers and then the next stack if needed. [8] That means printer, material, quality, or profile overrides can replace the values visible in the raw definition file. [8]
Cross-Slicer Taxonomy
Different slicers expose the same underlying idea with different labels, so comparing menus literally can be misleading. [6] [7] [9] [10] Cura splits the feature into an enable switch plus a highest-layer-only toggle, PrusaSlicer groups it by surface scope, Bambu Studio uses an ironing_type enum, and OrcaSlicer documents comparable modes in its wiki. [6] [7] [9] [10] For OrcaSlicer in particular, the documentation used here is the official project wiki and is community-maintained, so labels can shift across releases even when the concepts stay the same. [10]
Direction control also differs. [6] [9] [10] Prusa states that ironing is fixed at 45° relative to the first phase of normal top infill, Bambu Studio’s code shows an ironing-direction default of 45°, and OrcaSlicer exposes both angle offset and fixed-angle behavior. [6] [9] [10] Cura’s base definition exposes pattern and monotonic-order settings, but no separate ironing-angle setting appears there. [7]
| Slicer | Mode control (exact labels) | Pattern labels (exact) | Angle/direction control (notes) |
|---|---|---|---|
| Cura | Enable + “Iron Only Highest Layer” | Concentric; Zig Zag | No separate angle control is exposed in the base definition, and Monotonic Ironing Order exists. [7] |
| PrusaSlicer | All top surfaces; Topmost surface only; All solid surfaces | Not user-exposed as a pattern menu; uses a second infill phase. [6] | Fixed 45° relative to the first top infill phase. [6] |
| Bambu Studio | No ironing; Top surfaces; Topmost surface; All solid layer | Concentric; Rectilinear | Code shows an ironing direction default of 45°. [9] |
| OrcaSlicer | Top Surfaces; Topmost Surface; All solid layers | Concentric; Rectilinear | Angle offset and fixed-angle options are documented. [10] |
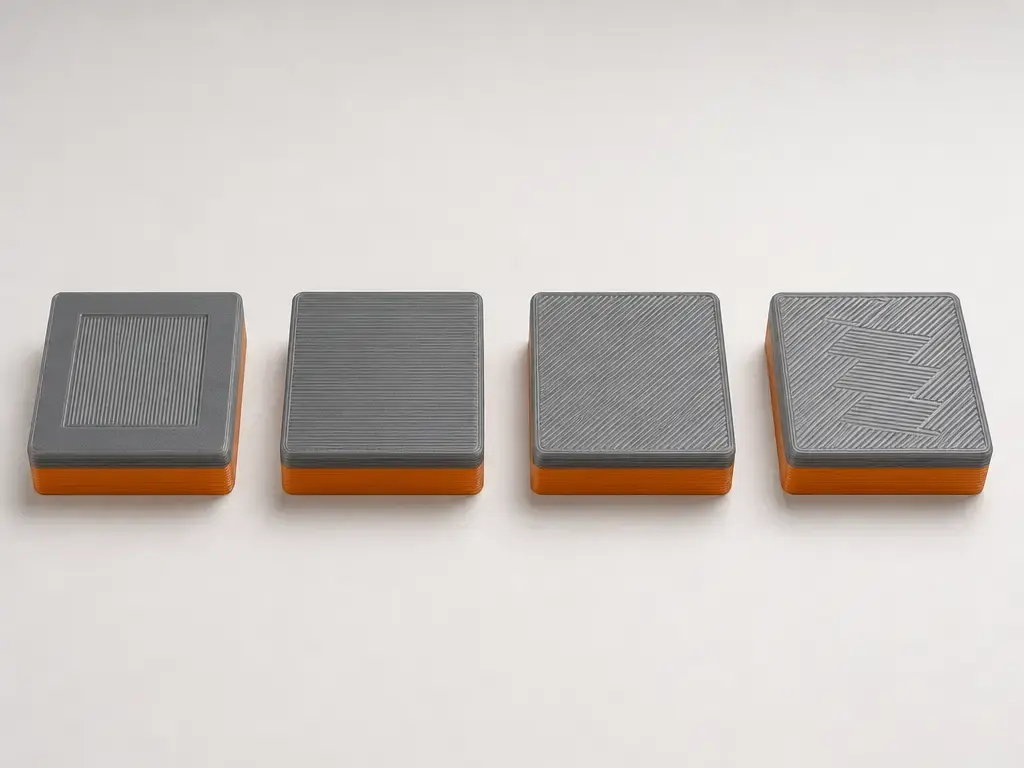
Ironing Modes: All Top Surfaces vs Topmost Only vs All Solid Layers
The three common scope choices are straightforward once the labels are decoded. [6] [10] All top surfaces means the last layer of each flat top area is ironed, topmost surface only means only the final layer of the whole object is ironed, and all solid layers means solid layers, including internal solid infill and top layers where supported, are ironed. [6] [10] That last category is not the same as every layer of any geometry. [6] [10]
Use all top surfaces when several stepped flats need the same finish, topmost only when only the final show face matters, and all solid layers only for narrow cases where the extra time and thermal exposure are acceptable. [6] [10] Prusa describes its all-solid option as experimental and aimed at 100% infill transparent objects, while OrcaSlicer notes that ironing all solid layers can increase print time significantly. [6] [10]
| Mode | What gets ironed | Best use | Main risk |
|---|---|---|---|
| All top surfaces | Each flat top surface’s last layer. [6] | Multiple stepped flats, lids, plates. [6] | Time increase and extra heat exposure. [6] [10] |
| Topmost surface only | Only the very last layer of the object. [6] | When only the show face is topmost. [6] | Lower features remain un-ironed. [6] |
| All solid layers | Solid layers, including internal solid infill and top layers where supported. [6] [10] | Specialty cases such as transparent or fully solid objects. [6] [10] | Very large time cost and greater heat or flow risk. [6] [10] |
Performance Metrics: What “Smooth” Means
A smoother-looking top surface is not automatically the same thing as lower roughness, better flatness, or higher gloss. [2] [3] [4] Roughness parameters such as Ra and Rz belong to profile texture measurement. [2] Flatness belongs to geometrical tolerancing. [3] Gloss is measured by a different method and different instruments. [4] A print can look visually cleaner after ironing while still showing a different flatness error than expected, or while gaining a slight gloss change without a matching drop in roughness. [2] [3] [4] It can also lose some perimeter crispness even when the center of the top surface improves, because edge sharpness is driven by how the nozzle and toolpath behave at the boundary. [6]
Case studies do show that ironing can reduce measured roughness, but the numbers are study-specific. [13] [14] The 2025 Materials study on top-surface ironing reported an optimized average surface characterized by Ra = 5.17 μm and FLTq = 28.1 μm in its first stage, then reported selected-condition results of Raₚ = 1.09 μm and FLTqₚ = 3.4 μm, with only a weak roughness-flatness correlation of r = 0.62. [14] The 2025 Coatings study reported validation Ra values of 0.852 μm for PLA and 1.014 μm for ABS, with model R² values of 0.9859 and 0.9839. [13]
Mechanical-property claims need a harder caution label. [12] The strongest strength gains in the supplied source set come from the 2024 Scientific Reports paper, but that paper studied ironing after every printed layer, not normal consumer top-surface-only ironing. [12] So it is reasonable to say that some ironing protocols can change mechanical behavior, but it is not reasonable to promise that enabling top-surface ironing in a home slicer will strengthen a part. [12]
Practical Starting Points for 3D Printing Ironing Settings
A sensible way to discuss 3d printing ironing settings is to separate three things: base slicer defaults, study windows, and calibration workflow. [7] [12] Cura’s base-definition defaults are 0.1 mm spacing, 10% flow, 0.35 mm inset, and 20 mm/s speed. [7] The 2024 Scientific Reports paper used a per-layer Box-Behnken window of 0.1, 0.2, and 0.3 mm spacing, 10, 20, and 30 mm/s path speed, and 10, 15, and 20% flow. [12] Those paper values are useful for understanding the range researchers considered, but they are not universal best settings for consumer top-surface ironing. [12]
The cleanest tuning order is flow first, spacing second, speed third, then pattern or angle only if your slicer exposes those controls. [6] [7] [10] Flow is the fastest way to create either blobs or patchy coverage, spacing controls overlap and missed areas, and speed governs how much heat the nozzle leaves in one place. [6] [7] [10]
- Calibrate normal extrusion before ironing. [6]
- Ensure enough top layers or top thickness before ironing. [6]
- Tune flow first when gaps or blobs appear. [6] [7] [10]
- Adjust spacing after flow. [6] [7]
- Adjust speed when heat exposure seems too low or too high. [6] [7]
- Preview time impact and toolpaths. [6] [7]
Limitations and Failure Modes
Ironing is mainly for flat top surfaces. [6] It does not do much for curves, overhangs, round figures, or sloped areas that are not parallel to the bed. [6]
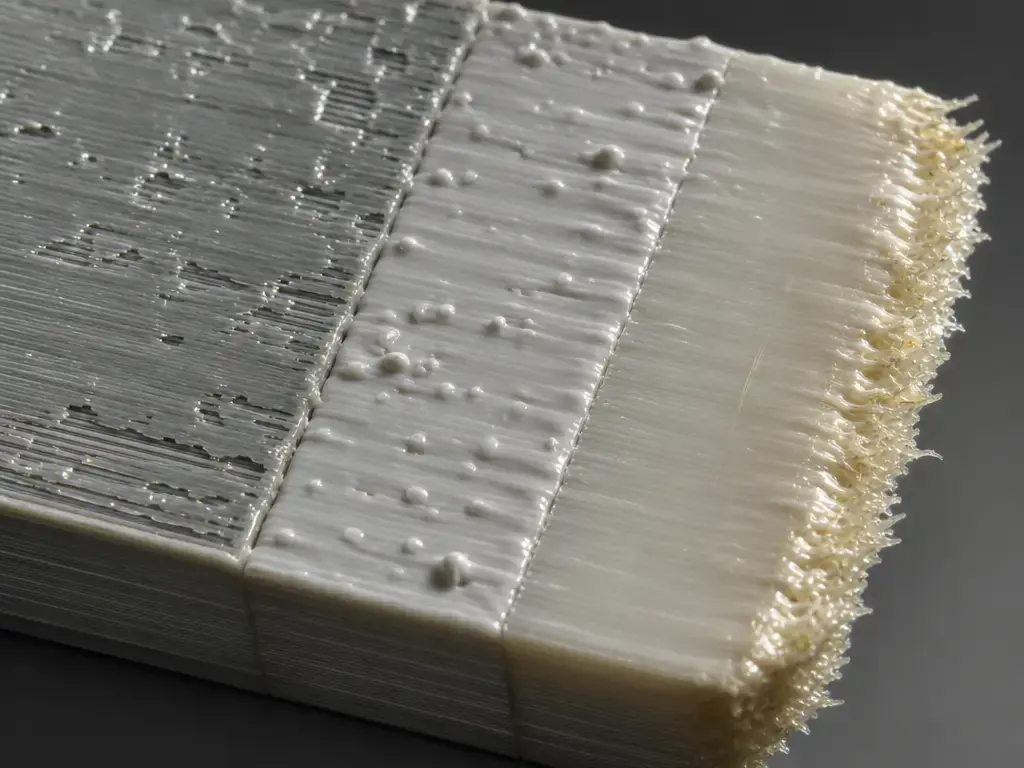
The common failure modes are predictable. [6] [7] [10] Patchy sheen usually points to too little ironing flow or spacing that is too wide. [7] [10] Blobs and ridges usually point to too much flow or too much dwell time from moving too slowly. [7] [10] Edge fuzz or jagged borders usually mean the pass is pushing softened plastic toward the perimeter, especially when inset is too small. [6] [7] Prusa and OrcaSlicer also warn that long, slow ironing moves can increase heat-creep and clogging risk on some machines because filament is moving slowly through a hot hotend. [6] [10]
There is also no reliable universal percentage for print-time increase. [6] The time penalty depends on surface area, mode choice, spacing, and speed. [6] For very large flat areas on printers that already run close to their thermal limits, ironing may simply not be worth the extra risk. [6] [10]
| Symptom | Likely cause | First check | First change |
|---|---|---|---|
| Gaps / patchy sheen | Under-extrusion during ironing; spacing too wide. [7] [10] | Ironing Flow; Line Spacing. [7] | Increase flow slightly or reduce spacing. [7] [10] |
| Blobs / ridges | Too much flow; too slow. [7] [10] | Ironing Flow; Speed. [7] | Reduce flow or increase speed. [7] [10] |
| No visible improvement | Baseline top surface poor; spacing too wide. [6] [10] | Top surface quality; spacing. [6] | Fix the top surface first, then reduce spacing if needed. [6] [10] |
| Edge fuzz / jagged edge | Inset too small; material pushed outward. [6] [7] | Ironing Inset. [7] | Increase inset, or reduce flow if material is piling at the edge. [6] [7] |
| Clogs / jams | Slow filament movement leading to heat creep. [6] [10] | Hotend cooling; mode selection. [6] [10] | Avoid huge areas, raise speed if appropriate, and monitor the printer. [6] [10] |
Applications
Ironing is most useful on nameplates, badges, lids, boxes, labels, enclosures, and similar parts where the visible top face matters more than the sidewalls. [6] It can also help when two printed surfaces will be glued or mated and a flatter contact face is helpful, but that should not be read as a promise of metrology-grade flatness. [6] If the most important show face can be placed on the bed instead, Prusa’s sheet guide notes that some users prefer the smooth and shiny bottom side produced on a smooth PEI sheet, which can be a simpler route than ironing the top. [11]
Current Research Snapshot
The current literature points in a consistent direction on surface finish, but not on one universal recipe. [12] [13] [14] [15] The 2024 Scientific Reports paper used PLA and a per-layer ironing protocol, reporting Ra dropping from 8.829 μm to 2.73 μm, alongside mechanical changes such as UTS from 43.91 to 56.47 MPa, compressive strength from 62.7 to 78.34 MPa, flexural strength from 63.34 to 85.73 MPa, and impact strength from 3.76 to 9.84 kJ/m². [12] The 2025 Materials paper used a top-surface protocol and measured both Ra and FLTq, which is useful precisely because it showed only a weak correlation between roughness and flatness. [14] The 2025 Coatings paper compared PLA and ABS and found different optimized outcomes, including validation Ra values of 0.852 μm for PLA and 1.014 μm for ABS, with example optimized settings of 28.64 mm/s, 19.89%, and 0.122 mm for PLA versus 30.25 mm/s, 17.23%, and 0.169 mm for ABS. [13] A 2025 fatigue-focused PLA study reported Ra values from 0.75 to 6.30 μm, fatigue life from about 10,700 to 20,400 cycles, ANOVA contributions of about 71% for speed, 11% for spacing, and 4.6% for flow, plus a negative Ra-to-fatigue relationship with R² around 0.60. [15]
The careful takeaway is that ironing can reduce roughness, and under some study protocols it can also affect flatness-related outcomes or mechanical behavior. [12] [13] [14] [15] What does not follow is a universal consumer preset. [7] [12] [13] [14] Even when research parameter windows overlap slicer defaults, the transfer still depends on material, geometry, nozzle, top-surface quality, and whether the study ironed only the top or every printed layer. [7] [12] [13] [14]
When Ironing 3D Printing Is Worth Using: Key Takeaways
Ironing 3d printing is worth using when a part has flat, visible top surfaces and you can afford extra print time to improve appearance. [6] Start from a clean baseline top surface, treat slicer defaults as starting points rather than answers, and tune flow, spacing, and speed for the specific printer and material. [6] [7] Keep an eye on edge quality and on heat-creep or clogging risk when ironing covers a large area or runs very slowly, especially on printers that are already thermally sensitive. [6] [10]
FAQ
Q: What is ironing 3d printing?
A: It is a slicer finishing pass for material-extrusion prints that revisits the top surface at the same height with very low extra flow. [6] [7] The goal is to flatten small ridges and fill tiny gaps on flat, upward-facing top faces, not to replace sanding or other external finishing methods. [6] [10]
Q: How do I enable ironing in Cura?
A: In Cura, turn on Enable Ironing, then choose whether Iron Only Highest Layer should also be enabled. [7] After that, preview the toolpath so you can confirm which surfaces will be ironed and how much time the extra pass will add. [6] [7]
Q: What are the best ironing settings for a smooth top layer?
A: There is no universal best set. [7] Cura’s base-definition defaults are 0.1 mm spacing, 10% flow, 0.35 mm inset, and 20 mm/s speed, but active profiles can override them and study-specific windows do not automatically transfer to home printers. [7] [8] [12]
Q: Why does 3D printing ironing cause rough or uneven top surfaces?
A: The usual causes are too much or too little ironing flow, spacing that is too wide or too tight, speed that leaves either too little or too much heat, or an inset that lets softened plastic pile up at the edge. [6] [7] [10] A weak baseline top surface can also make ironing look worse instead of better. [6] [10]
Q: Does ironing increase 3D print time?
A: Yes. [6] There is no reliable universal percentage because the increase depends on the ironed area, the selected mode, the line spacing, and the speed. [6] That is one reason ironing is best reserved for parts where the top finish matters. [6]
Q: Expert: Do Ra improvements from studies transfer to my consumer printer?
A: Not directly. [13] [14] The Materials and Coatings papers show that roughness can improve under controlled conditions, but their numbers are case-study outputs tied to specific materials, geometries, and protocols. [13] [14] They are useful as evidence of direction, not as guaranteed target values for your printer. [13] [14]
Q: Expert: Can ironing improve strength or fatigue life?
A: Possibly under specific study protocols, but that is not the same as saying ordinary top-surface ironing strengthens prints in general. [12] [15] The clearest strength gains in the supplied sources come from a per-layer ironing study, while the fatigue-context paper is PLA-specific and still tied to its own specimens and settings. [12] [15]
Sources
- ISO/ASTM 52900:2021 Additive manufacturing — General principles — Fundamentals and vocabulary. https://www.iso.org/standard/74514.html
- ISO 21920-2:2021 Surface texture — Profile — Terms, definitions and surface texture parameters. https://www.iso.org/cms/%20render/live/en/sites/isoorg/contents/data/standard/07/22/72226.html
- ISO 1101:2017 Geometrical product specifications (GPS) — Geometrical tolerancing. https://www.iso.org/standard/66777.html
- ISO 2813:2014 Paints and varnishes — Determination of gloss value at 20°, 60° and 85°. https://www.iso.org/standard/56807.html
- NIST Material Extrusion research area page. https://www.nist.gov/additive-manufacturing/research-areas/technologies/material-extrusion
- Prusa Knowledge Base — Ironing. https://help.prusa3d.com/article/ironing_177488?product=mk3-5s
- UltiMaker Cura base definition
fdmprinter.def.json. https://raw.githubusercontent.com/Ultimaker/Cura/main/resources/definitions/fdmprinter.def.json - UltiMaker Uranium
ContainerStack.py. https://raw.githubusercontent.com/Ultimaker/Uranium/main/UM/Settings/ContainerStack.py - Bambu Studio
PrintConfig.cpp. https://raw.githubusercontent.com/bambulab/BambuStudio/master/src/libslic3r/PrintConfig.cpp - OrcaSlicer Wiki — quality settings ironing. https://github.com/OrcaSlicer/OrcaSlicer/wiki/quality_settings_ironing
- Prusa Knowledge Base — Flexible steel sheets guidepost. https://cdn.help.prusa3d.com/article/flexible-steel-sheets-guidepost_2195?product=mk3-9s
- Alzyod, H., & Ficzere, P. Scientific Reports (2024) — per-layer ironing study on PLA MEX components. https://www.nature.com/articles/s41598-024-52827-5.pdf
- Chen et al. Coatings (2025) — ironing optimization for PLA and ABS. https://www.mdpi.com/2079-6412/15/11/1354
- Materials (2025) — top-surface ironing with Ra and FLTq analysis. https://www.mdpi.com/1996-1944/18/22/5248
- Materials Today Communications (2025) — PLA fatigue context for ironing optimization. https://www.sciencedirect.com/science/article/pii/S2352492825030673